Friday, June 15, 2012

Chevron has Arrived!!

Boy are these babies popular! They have been on back order since March, but they are finally here! I love getting Friday UPS deliveries like these!

Both Aqua and Gray Chevrons are available in the shop in both yardage ($4.50/half yard) and in fat quarters ($2.50).


Get them while you can, these Chevrons sell out fast!

I hope everyone has a wonderful weekend.We are heading out on Saturday for our first family camping trip for Daddy's Day and the kiddos couldn't be more excited!

Here's to a Sunshiny Weekend!
  Kris


Wednesday, June 13, 2012

Flower Doodle Giveaway

Next up in the giveaways from my Quilt Market adventure is a FQ Bundle of purple and green coordinating fabrics from the Flower Doodle line by Kim Schaefer for Andover Fabrics. The bundle consists of 5 FQs and retails for $13.50!!! 
Enter by making a purchase at www.fabricnerds.com (no minimum purchase required) by Weds. June 20th and your name will automatically be added into the drawing. Winner will be chosen by random using random.org. 


Good Luck to everyone! 
♥ Kris

Monday, June 11, 2012

DIY Photo Canvas

This past Friday night I had the joy of a quiet night alone (hubby had a guys night & kids asleep) so I decided to have a Crafty Mama Night, got a Mike's Strawberry Lemonade, put on some Gretchen Wilson, and conquered a pile of crafting supplies. My outcome...


I must say I am so completely happy with how it turned out! We redid our living room about a year ago but our walls for the most part were still bare. I love how this canvas wall adds some color to our walls and but more importantly shows what this room is about... our family. It's where we play games, watch movies, build blanket tents, and just be together as a family.

So getting to what you all want to know. How did you do it? Well for starters my inspiration comes from Pinterest (of course). Pinterest showed so many different ways on how to make your own canvases but fell in love with this one over at Girl. Inspired. She also has a tutorial if you want to check out hers. But here is mine:

These are a quick, fun, and easy way to decorate your house. I now want to make more for presents. The best part though...the cost! Here is my total:

1 hr Photos Printed ( One-11x14"  Six-8x10"  Four 5x7") =$32.00 
Canvases= $30.00 (Michaels at 40% off and had a 20% off entire purchase coupon)
Mod Podge = $4.50
Brushes = FREE (already had)
Scrapbook Paper = $3.00 (Michaels)
Brown Paint = FREE (already had)

Grand Total= $69.50 
Which is around the cost of One 11x14" professional canvas and I made 11!!! 

Supplies Needed:

Printer Paper
Tape
Mod Podge (Matte)
Blank Canvases (try to get ones with flat sides without folds, makes life easier when modge podging)
Scrapbook Paper
Paint in your choice of color
Foam brushes
Photos
Rotary Cutter or whatever you prefer for cutting straight
Straight Edge Ruler

Steps:

1. Take your printer paper and cut to the size of the canvases you will be creating. Tape them on the wall to get the idea of the layout you want. This was my layout...


2. Get all your supplies and and start to cut strips of your scrapbook paper into the width and length of the sides of your canvas (Note: Cutting the paper just a bit thinner than the width and shorter than the length I found worked better)

3. Once you have your strips cut for your first canvas, brush the Mod Podge along the sides and glue on your strips. Once your strips are glued on apply Mod Podge to the front of your canvas and glue your photo on. 

4. Allow to dry completely (approx 30 mins). Once canvas is dry, apply a coat of Mod Podge over the entire picture and sides. (Do not worry Mod Podge dries clear)

5. Once your canvas has completely dried take your paint color of choice and "antique" sides and corners with your foam brush. This step helps to hide the seam between the photo and the scrapbook paper while adding character to the photo. 

Made a little mistake with the paint? No problem! Since the Mod Podge has dried completely, if you make a little mistake a damp cloth easily takes the paint right off


And remember that DIY projects are not to reach for perfection, but instead to try something new and have a little fun!

Happy Monday!
<3 Kris


Sunday, June 10, 2012

END OF THE BOLT SALE


Fabric Nerds is having an END OF THE BOLT SALE!  Prices have been slashed to make room for new fabrics in the upcoming months. Fabrics being added throughout the week, so keep checking back.

Hope everyone is having a wonderful weekend!
<3 Kris

Wednesday, June 6, 2012

Freezer Meals: Take 1

Yes, I have jumped on the freezer meal bandwagon and I am loving it! I made 2 family dinner servings of 5 different freezer meals. That's a total of 10 meals prepared and ready for the freezer or the crockpot in only a couple of hours!! How could you not love that?! Last weekend I had one of those rare nights when both kids were asleep by 7pm (I think it was all the geocaching we did that day). I figured I would seize the opportunity to start meal planning before I was ready for bed. Here is part of the outcome my couple of hours of hard super simple work...


The meals I made were:

Semi-Homemade Meat Sauce (1 dinner worth)
Homemade Meatballs (for either Meatball Parms or Spaghetti) (3 dinners worth)
My famous Sausage & Peppers (2 dinners worth)
Ring Around the Rosies's Teriyaki Chicken (2 dinners worth)
Homemade Sloppy Joes (2 dinners worth)

Unfortunately, when it comes to my own recipes for cooking I don't usual follow the "recipe" the same time twice. I do know though that I love finding new recipes to test out, so I will attempt to make some recipes for the meals I made.

ITEMS NEEDED FOR ALL MEALS:

 -Gallon Size Freezer Bags
 -Sharpie Marker

Note: I like to write the date, what is in the bag, time in the crockpot, and anything else that needs to be added into the crockpot

Semi-homemade Crockpot Meat Sauce (Freezer Version):

Ingredients:
1 lb ground beef browned
2 16oz an of tomato sauce (i use Hunt's Basil and Oregano)
1 tsp Italian seasoning
1/2 tsp dried basil
1/2 tsp oregano
1/2 tsp black pepper

Freezing Directions: While browning ground beef, Mix all other ingredients in a medium size bowl and divide in half. Put one half in a gallon size freezer bag, and keep the rest to the side for later (italian meatballs). After ground beef has been browned and slightly cooled add that to the freezer bag with other ingredients and gently shake to mix in ground beef.  If you do not want to freeze, skip the freezer bag part and cook on low in Crockpot for approx 4hrs


Italian Meatballs (Freezer Version):

Ingredients:
3lbs of ground beef
2 eggs
1/2 cup of milk
1 cup of breadcrumbs
1 tsp of salt
2 tsp of oregano
2 tsp of basil
1 tsp of garlic powder
1 tsp of ground black pepper
1/2 cup of grated parmesan cheese
1 Tblspn of oil
Crockpot Meat Sauce

Directions: Mix all ingredients in a large bowl by hand. Heat up frying pan with a Tblspn of oil. Roll meatballs into golf size balls (i like to use a cookie scoop to do this) and place in heated frying pan. Continue to turn meatballs in frying pan until cooked on all sides. Remove meatballs from frying pan and place on paper towels. Continue until all meat mixture has been cooked. Divide meatballs evenly (makes about 60) and place in 3 freezer bags. Put a 1/3 of reserved sauce from recipe above in bag with meatballs and gently shake to mix. When ready to use, cook in crockpot and add a jar of your favorite sauce (or create sauce above minus ground beef). Cook on low for approximately 4hrs.

Serve over spaghetti or on italian rolls with parmesan & mozzarella cheese for meatball parms.


As the week goes on I will figure out how I make my sausage and peppers and sloppy joes and will get them posted for you all. For now I hope you enjoy these recipes. You will definitely not be disappointed with them, especially the Italian meatballs, they are DELICIOUS!!

Happy Hump Day!
<3 Kris
Fabric Nerds


Monday, June 4, 2012

Fondant: (n) Adult Play-Doh

This past weekend I was super busy getting ready for my best friend's baby shower. We have been friends since the 6th grade and we are so similar in so many ways that I think we were separated at birth and just lived on different sides of town (my side being the better one ha!). She has done so much for me in the past that I wanted to do something a little special for her shower so, I volunteered to do the cupcakes, cake, and fruit salad. In the past we have always gotten together before a party that we are either helping with or hosting and bake up some delicious creations. This was my first solo run with fondant...ahh!  The theme of her shower was Peter Rabbit so I hopped on Pinterest and Google images to get some ideas of what I wanted to do. 
First I found these super cute cupcake liners on Amazon, and these adorable picket fence cupcake wrappers by Wilton at Michael's..

These two things got the vision in my head that I needed. So I headed to Michael's and Shoprite to buy my cake mixes and decorating supplies. I borrowed a beautiful cupcake tower from another friend of mine so I knew I wanted to make a cake to go on the top tier and then also 48 cucpcakes for the other tiers. For two days I attempted to make a 3d version of Peter Rabbit (umm yeah wasn't happening.) So finally I decided to go the route of "simply adorable" (simply the keyword)  and had fun making miniature size vegetables for Mr. McGregor's garden and this was my outcome...


My friend and her husband are not telling anyone the name they have chosen so I made a cute wooden sign and made it looked etched in with "Welcome Baby". I am quite pleased with the final result on my first solo project.

 A lot of people asked me at the party how I made the sign look like wood grain and it was actually quite simple. Here is my little secret...I used Duff's butter cream fondant from Michael's it has a creamy color look to it and as far as fondant goes actually tastes pretty good. I took a clump of fondant in the amount of much I thought I would need and took 2 toothpick scoops worth of brown gel colouring and then rolled the fondant into a fat log shape. Then I took the log and folded it in half and rolled it into a log shape again. Then I folded that log in half and rolled it into a log again, and continued with this pattern until I had a nice wood grain look and rolled it out. I took my back end of my knife and made little indentations in the fondant sign to give the effect of an old piece of wood. I then attempted to make the words look burned into the wood bydotting a brown food color pen in to the fondant to form the letters.

My cupcakes I wanted to look like a carrot patch and a flower garden so I used a #233 icing tip which is a multi-opening tip. I put the chocolate cupcakes in the picket fence wrappers and the vanilla in the peter rabbit liners...


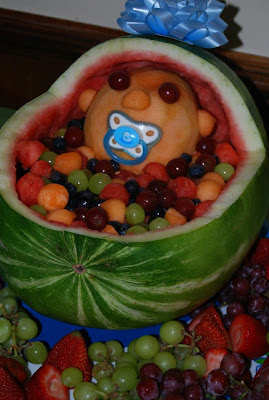
I was also in charge of the fruit salad and for anyone who knows me I can't just go simple for most things so I went on Pinterest and found this adorable picture of a baby in a cradle fruit salad. Here was my early morning attempt and I have to say it came out stinkin cute!


If you guys have any questions on how I did anything or where I got stuff please feel free to ask. I am not one to keep my techniques or were I found things a secret :)

Hoping you all have a wonderful week!
<3 Kris


Wednesday, May 30, 2012

A Plan (Thankfully) Interrupted

So as you all know my hubby was away this past weekend and I planned on doing a whole bedroom makeover for him while he was away. I had my mind set to finish our quilt and give our bedroom a more "grown-up" look and then I got ambushed by cuteness! How could I say no?!


So needless to say my bedroom did not get the makeover it so desperately needs but I am so completely happy that I got ambushed by this cuteness. It was a mini wake up call to chill, throw my to do lists out the window, and enjoy the weekend with my beautiful munchkins <3

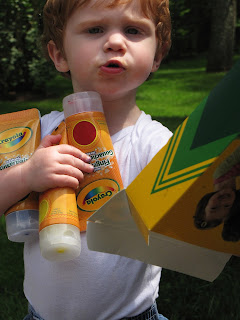
Our weekend was filled with FINGERPAINTS...


OATMEAL CHOCOLATE CHIP COOKIES...


SPRINKLERS...


AND SMALL TOWN PARADES.

Kiddos with their Nana


 It was a terrific weekend for my family and I. A great reminder for me that sometimes I need to just throw out my to do lists/plans and just sit back and soak up the day and the freedom our military men and women protect and fight for us to have and enjoy. 

I hope you all had a wonderful weekend and continue to have a terrific week ahead :)
<3 Kris

**FQ BUNDLE WINNER ANNOUNCEMENT** 
Our winner for the FQ Bundle of Savannah Bop was Beth Miller! Congrats to Beth!